Finish Your Molded Part with Coloring and Secondary Operations
As you reach the final stages in production of your molded parts, you are probably thinking about what finishing options exist for things like color and texture to get your part exactly where you want it. In this post, we highlight the various secondary operations that designers sometimes require and provide a recap on the most important molding considerations highlighted in our Molding Made Easy series.
Custom Color for Your Parts
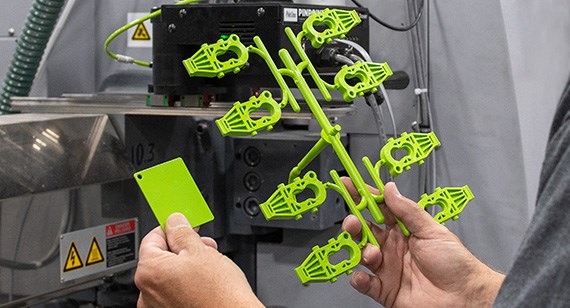
A great way to add a highly specific color to plastic parts is to use a custom colorant in the resin. Colorant works best when starting with a resin that comes in natural or clear. A small amount of dye pellets are mixed in the resin in a technique known as a salt-and-pepper mix. The mixture blends while the plastic melts before injection. We offer custom color matching on customer-supplied Pantone numbers and customer-supplied part samples to create the exact color that you are looking for.
Designing a Big Finish
Plastic parts come in a variety of finishes, ranging from a polished, reflective look, to a softer look and feel. It is also possible to have multiple finishes on a single part. This is achieved through mold texturing before the part is created. Polish and texture are applied directly to the mold itself and transferred to the parts during the injection molding process. We offer various finishes outlined in the table below.

Custom color matching at Brazil Metal Parts reduces development time, enabling companies to get to market faster; provides custom branding; and ensures consistent run-to-run quality and colorant properties.
| Finish Callout | Description |
|---|---|
| PM-FO | Brazil Metal Parts texture; non-cosmetic; finish to Brazil Metal Parts' discretion |
| PM-F1 | Brazil Metal Parts' texture; low cosmetic; most tool marks are removed |
| PM-F2 | Brazil Metal Parts' texture; non-cosmetic; EDM permissible |
| SPI-C1 | 600 grit stone |
| SPI-B1 | 600 grit paper |
| SPI-A2 | Grade #2 diamond buff |
| PM-T1 | Brazil Metal Parts texture; light bead blast |
| PM-T2 | Brazil Metal Parts texture; medium bead blast |
Applying Secondary Operations
Beyond adding color and a surface finish to injection-molded parts, there are also a variety of secondary operations that can be added to the part after it has been molded. Threaded inserts are possible through heat staking (press-fitting heated inserts into a molded part) and ultrasonic welding (using high frequency acoustic vibrations to press-fit inserts). Pad printing transfers a two-dimensional image onto a three-dimensional object. This is often used for applications such as adding a company logo to a product. Laser engraving is applied to the mold or directly to final parts providing crisp, consistent information on each part or serialization. Part assembly involves kitting, fastening parts together, and/or applying labels to individually bagged parts.
Upon Further Inspection
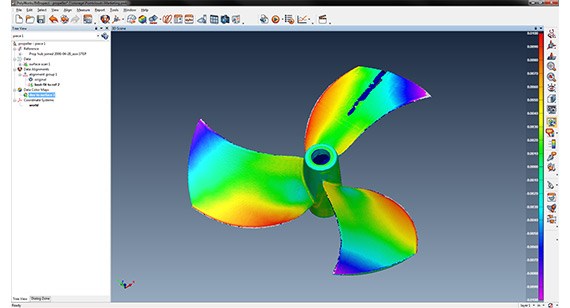
Quality-assurance systems play a key role in injection molding—in many industries, companies will only do business with suppliers that have quality assurance systems in place. Digital inspection reports include angle measurements, plane-to-plane measurements, measurement of inner diameter (ID) and outer diameter (OD), and hole location in reference to a predetermined point. The report also verifies a set of critical dimensions and includes a color map identifying dimensional variances. Conventional inspection reports are more formal and include an unlimited number of dimensions and most geometric dimensioning and tolerancing (GD&T) measurement types. Some industries also require additional, industry-specific quality assurances and documentation, such as the production part approval process (PPAP) used within the automotive industry to document design quality and reproducibility.

Digital inspections use a laser-based 3D scanner to evaluate critical dimensions and generate a color map making it easy to identify dimensional variances.
Seven Things to Remember when Designing Molded Parts
As we wrap up our Molding Made Easy series, we leave you with a recap of the top seven things to remember when designing for molded parts.
- Understand the concept: The four basic steps in the injection molding process include melting the plastic pellets, injecting the melted plastic into the mold, letting the molded part cool, and ejecting the finished part out of the mold.
- Remember the fundamentals: When designing for injection molding, choose the material carefully and remember proper draft angles, consistent wall thicknesses, and no unnecessary part features.
- Get the design done correctly: To get accurate parts quickly, keep in mind that all plastic parts deform and molds are built larger than the required part size to account for shrink.
- Match resin to part function: Consider the mechanical properties of the part, characteristics of resins, and cost when deciding on material. Keep in mind there are two broad categories of plastics—thermoplastics and thermosets, differentiated based on how they behave in the presence of heat.
- Conquer advanced parts: Go beyond simple, straight-pull molds to create advanced parts using side-actions, bumpoffs, inserts/pickouts, and multi-cavity molds.
- Consider overmolding and insert molding: Overmolding can enhance design, add functionality, and improve cosmetics by adding an additional layer of resin to provide a combination of characteristics no single material can provide. Insert molding adds strength and durability by bolstering areas of the part with metal.
- Add the finishing touches: As discussed above, don’t forget coloring, texturing, and secondary operations when designing for injection molded parts.

Injection Molding Design Book
For more detailed information on all of the above, plus other considerations for injection molding design, order a free copy of Injection Molding Design for Dummies.