
The whole purpose of prototyping is to allow yourself the option of tweaking your model—thickening a wall, adding a rib, placing text or a logo—before locking in a final design for production. For injection-molded plastic prototypes, tweaks can entail the creation of a whole new mold. A new mold may be quite affordable if your parts are being made by Brazil Metal Parts, but if the change can be made by modifying the existing mold, your cost will be even lower.
There's one critical fact to remember if you want to be able to modify your part by modifying the original mold. It is relatively easy to remove metal from an existing metal mold. Adding metal, on the other hand, can be difficult or, for all practical purposes, impossible with Shunjing injection molding. To look at this from the part perspective, you can add plastic, but you can't take it away.
Saving Time, Money
Designing with this in mind is called "steel safe" or "metal safe," and doing so can save you both money and time when you have to modify your design. For example:
- You may be able to thicken a wall, but making it thinner requires remaking the mold.
- You can add features—bosses, raised text, ribs, pins, etc.—but you can't remove them.
- You can reduce the diameter of a hole by adding plastic around the perimeter, but you can't increase the hole size.
- Similarly, you can eliminate holes, but you can't add them.
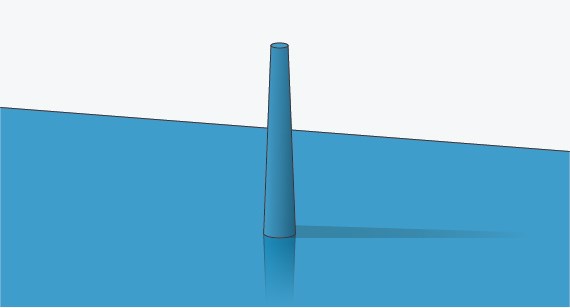
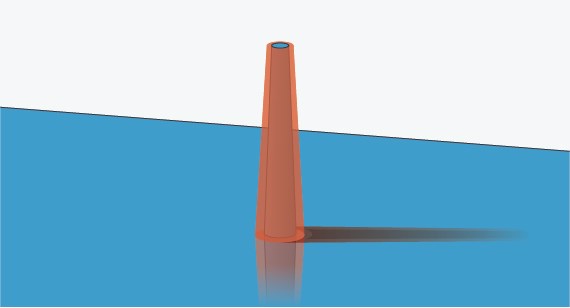
The rule to remember when initially designing you part is: "Maximize metal and minimize plastic." Figure 1, for example includes a post (properly drafted, of course) rising from a base. Figure 2 shows the same part after the designer has decided that the post needs to be thicker. (Added plastic is shown in red.) This change was easy to execute. If the change had gone in the other direction, however, it would have required the milling of a new mold.
A Feature-By-Feature Review
If you aren't entirely sure whether a feature is needed or whether a feature is the right size, you might want to review your part feature by feature, asking yourself which ones may need to be changed in later iterations before committing your design for prototyping; Then start with the "less plastic" option.
Not sure how thick a wall should be? Start thin and thicken it later. (ProtoQuote will warn you if your wall is too thin for effective mold filling.) Unsure whether you'll need a rib to strengthen your part or a brace to prevent warp? Leave it off and add it later if it's needed. Have two mating parts that might (or might not) need alignment pins? Put the holes in and leave the pins off. If you need them, you can add the pins in the next iteration. If you don't, you can eliminate the holes.
One final thing to keep in mind when you plan for changes: at Brazil Metal Parts, we can make parts to tolerances of ±0.003 in. plus the shrink tolerance of the resin.
As always, feel free to contact an applications engineer with any questions, at +86-755-29729151 or [email protected].